 Canonical has officially announced the presence of a few days ago Ubuntu 11.04. As usual we have won a copy of the most anticipated operating system and present it to you.
Before installing Ubuntu 11.04, we remind you that use the default Ubuntu 11.04 Unity as the default Ubuntu Desktop session. For those who have been accustomed to install a Linux distro or previous Ubuntu versions, the latest Ubuntu installation process is not much different and you will not have much trouble.
For those of you who first installed Ubuntu as the operating system on the computer you use, you should consider a few things to consider before installation. I wanted to mention it because any small mistake made during the installation process has the potential to erase or remove data and other important files and it will never be restored again.
Note also that in Ubuntu 11.04 installation simulation we use a blank hard drive capacity of 40GB, so there are no data or other operating systems installed in the hard drive. Therefore, for beginners we recommend to use a blank hard drive and would have little difficulty in following this tutorial.
Prepare your Ubuntu 11.04 Desktop version installer, for those who do not have it please download here and memburningnya into a CD.
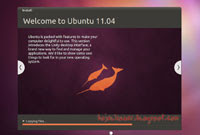
Before performing the installation, run the CD as the Ubuntu 11.04 boooting media first, on the welcome screen "Welcome" select the option "Try Ubuntu" to run as a Live CD Ubuntu 11.04 desktop, the purpose of this step is to make sure the installer and the media reader that you use in conditions fine. This step is also used to check if all devices on the computer being used can be properly recognized by Ubuntu. If all goes well, you can use the shortcut "Install Ubuntu" contained on the desktop or restart the computer to start istalasi directly.
On the "Preparing to install Ubuntu", Ubuntu will check the readiness of the device including the availability of internet connection. In this step, if you have an internet connection we recommend that you should disable the option "Download updates while Installing" and "Install this third-party software" because it will make the installation process run long. Press the "Forward" to continue to the next step ...
On the "Allocate disk space" will be two options "Erase disk and install Ubuntu" and "Something else" if the drive is empty. But if the hard drive is there any other operating system such as Ubuntu 10.10 is displayed then the option is "Ubuntu 11.04 Intstall alongside Ubuntu 10.10", "Upgrade Ubuntu 10:10 to 11:04", "Erase and reinstall Ubuntu 10.10" and "Something else". Because in this example we use a blank hard drive, select the last menu "Something else" to create partitions manually (for installing Ubuntu 11.04 with another operating system or upgrade to Ubuntu 10.10 will be reported in a different article). The purpose of setting up partitions manually you can read the article "How to create the Ubuntu partitions manually". Press the "Forward" to continue ...
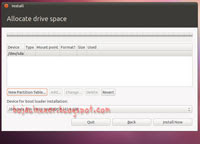
On the next screen, hard drive we use are recognized as "/ dev / sda", press the "New Partition Table ..." (Because the disk is still used in empty condition) so that you will get a "free space".
Creating a swap partition - Select the free space on it and press the "Add". In the "Create new partition" option select "Primary" on "for the new partition Type:", enter the amount kampasitas swap partition you want to create in units of megabytes, for example, 1024 on "New partition size ...". Select the option "Beginning" in the "Location for ...", select the option "swap area" on the dropdown menu "Use as:", then press the "OK" to create a swap partition ...
Creating partitions / (root partition where to install the system) - Select the free space is still there and press the "Add". In the "Create new partition" option select "Primary" on "for the new partition Type:", enter the amount kampasitas partition "/" you want to create in units of megabytes, for example, 20 000 in the "New partition size ...". Select the option "Beginning" in the "Location for ...", select the option "ext4journaling file system" on the dropdown menu "Use as:", select "/" on the dropdown menu "Mount point:" then press the "OK" to make partition "/" ...
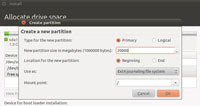
Create a partition / home (home partition to store user data and settings) - Select the free space is left and press the "Add". In the "Create new partition" option select "Primary" on "for the new partition Type:", enter the amount kampasitas partition "/ home" that you want to make in units of megabytes, for example, 20 000, or no matter how the remaining free space remaining on the "New partition size ...". Select the option "Beginning" in the "Location for ...", select the option "ext4journaling file system" on the dropdown menu "Use as:", select "/ home" on the dropdown menu "Mount point:" then press the "OK" to create a partition "/ home" ...
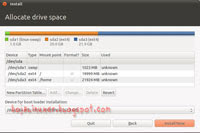
After all required partitions are ready, press the "Install Now" to start the installation process ...
The next step you will only be asked to enter personal information system needs. Determine your hometown, select the keyboard layout in use or leave the default state.
On the "Who are you?", Put all the necessary information. Enter your full name in the "Your name:", enter the computer name yanga you want on the "Your computer's name:" or let the system determine, enter the user name you wish to use to log on "Pick a username: 'or allow the system to be premises fit your name (preferably set yourself), enter the password you want to use the "Choose a password:" and "Confirm your password:". Finally, choose the option as to which way the system log, you should select the option "Require password to log in my" and do not select the option "Encrypt my home folder" if you do not know its use.

Now you just waiting for the installation process is completed, restart the computer if the process was declared complete and the information dialog is displayed.
This is the boot spash Ubuntu 11.04 ...

At the GDM login screen, select or enter your username and password and press enter or press the "Login" to run the Ubuntu desktop.
Warning dialog will be displayed if VGA is used has not been configured / recognized, click the "Close" and you will automatically go into session "Classic Ubuntu" uses Gnome as the desktop environment 2.32.1.
To be able to use Unity, you need a graphics device that has been recognized by Ubuntu, or you can configure / install the VGA driver is used.
This beautiful desktop in Ubuntu 11.04 Unity ...

0 komentar:
Post a Comment